Allocating Your SmartBenefits
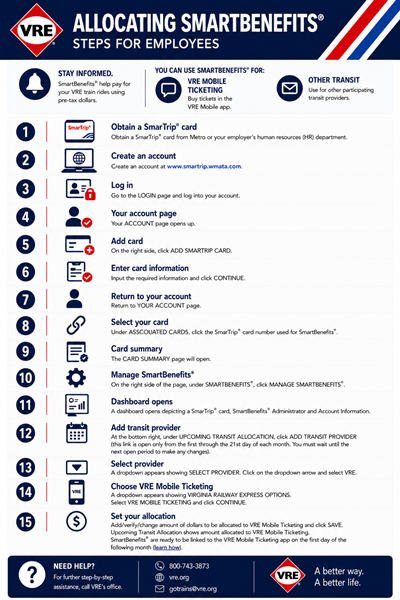
- Obtain SmarTrip card from Metro or employer’s human resources (HR) department
- Obtain Organization Code from HR transit benefits coordinator
- Create an account at www.smartrip.wmata.com
- Go to the LOGIN page and log into your account
- YOUR ACCOUNT page opens up
- On the right side, click ADD SMARTRIP CARD
- Input the required information and click CONTINUE
- Return to YOUR ACCOUNT page
- Under ASSOCIATED CARDS, click the SmarTrip card number used for SmartBenefits
- The CARD SUMMARY page will open
- On the right side, under SMARTBENEFITS, click JOIN SMARTBENEFITS
- to link your account
- Enter your Organization Code, agree with the terms, and click SUBMIT
- Return to the CARD SUMMARY page
- On the right side of the page, under SMARTBENEFITS, click MANAGE SMARTBENEFITS
- A dashboard opens depicting a SmarTrip card, SmartBenefits Administrator and Account Information
- At the bottom right, under UPCOMING TRANSIT ALLOCATION, click ADD TRANSIT PROVIDER (this link is open only from the first through the 21st day of each month. You must wait until the next open period to make any changes)
- A dropdown appears showing SELECT PROVIDER
- Click on the dropdown arrow and select VRE
- A dropdown appears showing VIRGINIA RAILWAY EXPRESS OPTIONS
- Select VRE – MOBILE TICKETING and click CONTINUE
- Add/verify/change amount of dollars to be allocated to VRE Mobile Ticketing
- Click SAVE
- Upcoming Transit Allocation shows amount allocated to VRE Mobile Ticketing
- SmartBenefits are ready to be linked to the VRE Mobile Ticketing app
 Linking SmartBenefits to VRE Mobile
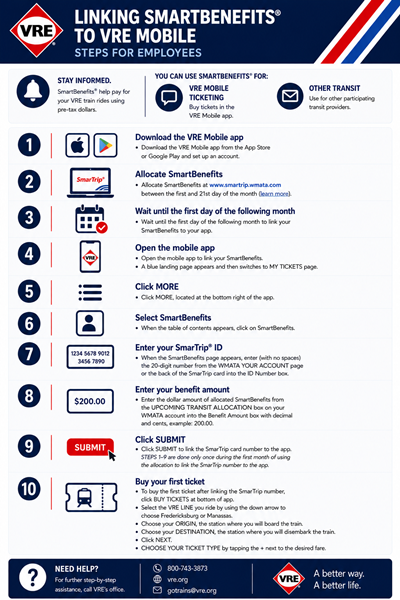
- Download the VRE Mobile app from the App Store or Google Play and set up an account
- Allocate SmartBenefits at www.smartrip.wmata.com, between the first and 21st day of the month (learn more)
- Wait until the first day of the following month to link your SmartBenefits to your app
- Open the mobile app to link your SmartBenefits
- A blue landing page appears and then switches to MY TICKETS page
- Click MORE, located at the bottom right of the app
- When the table of contents appears, click on SmartBenefits
- When the SmartBenefits page appears, enter (with no spaces) the 20-digit number from the WMATA YOUR ACCOUNT page or the back of the SmarTrip card into the ID Number box
- Enter the dollar amount of allocated SmartBenefits from the UPCOMING TRANSIT ALLOCATION box
- on your WMATA account into the Benefit Amount box with decimal and cents, example: 200.00
- Click SUBMIT to link the SmarTrip card number to the app. STEPS 1-9 are done only once during the first
- month of using the allocation to link the SmarTrip number to the app.
- To buy the first ticket after linking the SmarTrip number, click BUY TICKETS at bottom of app
- Select the VRE LINE you ride by using the down arrow to choose Fredericksburg or Manassas
- Choose your ORIGIN, the station where you will board the train
- Choose your DESTINATION, the station where you will disembark the train
- Click NEXT
- CHOOSE YOUR TICKET TYPE by tapping the + next to the desired fare
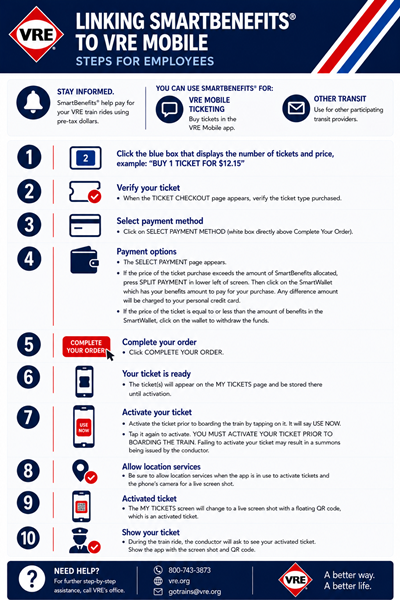
- Click the blue box that displays the number of tickets and price, example: “BUY 1 TICKET FOR $12.15”
- When the TICKET CHECKOUT page appears, verify the ticket type purchased
- Click on SELECT PAYMENT METHOD (white box directly above Complete Your Order)
- The SELECT PAYMENT page appears
- If the price of the ticket purchase exceeds the amount of SmartBenefits allocated, press SPLIT PAYMENT in lower left of screen. Then click on the SmartWallet which has your benefits amount to pay for your purchase. Any difference amount will be charged to your personal credit card
- If the price of the ticket is equal to or less than the amount of benefits in the SmartWallet,
- click on the wallet to withdraw the funds
- Click COMPLETE YOUR ORDER
- The ticket(s) will appear on the MY TICKETS page and be stored there until validation
- Validate the ticket prior to boarding the train by tapping on it. It will say USE NOW
- Tap it again to validate. YOU MUST VALIDATE YOUR TICKET PRIOR TO BOARDING THE TRAIN.
- Failing to validate your ticket may result in a summons being issued by the conductor
- Be sure to allow location services when the app is in use to validate tickets and the phone’s camera for a live screen shot.
- The MY TICKETS screen will change to a live screen shot with a floating QR code, which is a validatedticket
- During the train ride, the conductor will ask to see your validated ticket. Show the app with the screen shot and QR code